
Paypal integration use to be a real pain for many developers. They use to change their interface(especially their sandbox and developer environment). In fact there is a strategy for the paypal integration and if its followed properly this is an easy process. Have a look at this guide which completely guide you to php paypal integration.
[steps]1 [/steps]Objectives and Steps
- Step 1 : Create Sandbox testing account.
- Step 2 : Implement the paypal buttons.
- Step 3 : Doing the transactions,setting up the return url, and verifying the transaction.
- Step 4 : Setting an IPN (instant payment notification).
Create sandbox testing accounts in paypal developer section.
You need to login to paypal developers section. You may login with your exact paypal,address, that is the one you use to login to paypal.com. After that you need to create a sandbox account in paypal. After creating the sandbox account you need to login to the sandbox.paypal.com
What is paypal sandbox?
Sandbox is nothing but a testing environment of paypal. You can create seller and buyer account in sandbox and can do test transactions exactly like the paypal live transactions. And of course no one would be losing any money, you can add or transfer as much as money you like (say in dollars ) as like we see in some games. And once you’ve done the testing, you can change it easily to live by changing all instances of sandbox to paypal, that is if there is something like http://sandbox.paypal.com in your code, just change it to http://paypal.com.
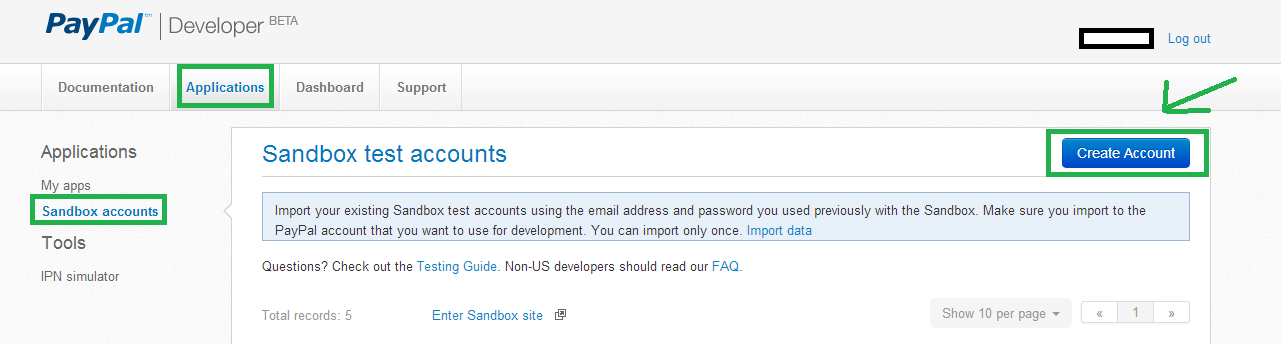
Create one personal(to send money) and one business account(to recieve money). You can create the test accounts with fake emails, provided it doesnt exist in the paypal database. Add an amount to the paypal balance text box( the required money ) say 500 and that much money will be there inside your paypal account. I’ve created two testing accounts here
- a business account – businesstest@gomakebig.com
- a personal account – personaltest@gomakebig.com
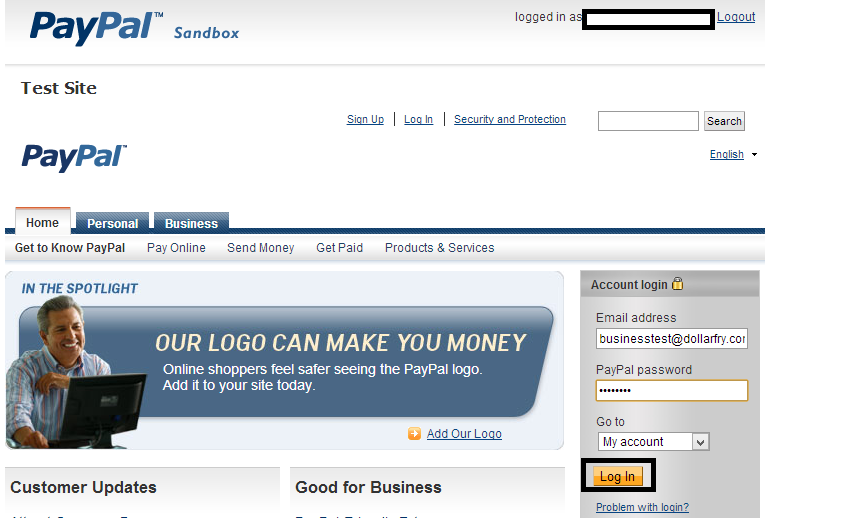
After that I am going to log in to the sandbox environment of the business account. As seen in the screenshot below, I’ve selected the business account and then the Enter the Sandbox link which will drop us into the sandbox environment. You need to login to the sandbox account with the business (or personal account) credentials(which you’ve created a while ago).
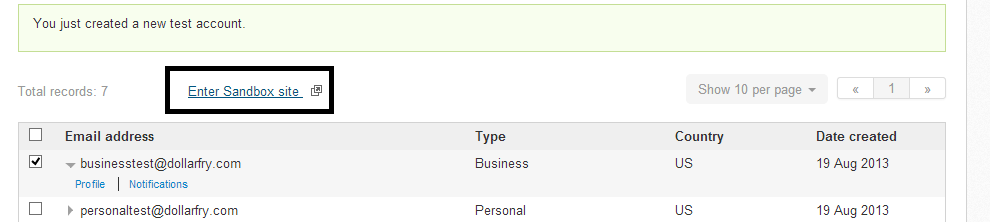
And once you login , you can see that test sandbox account has came up exacly like a real paypal account(you can see the account balance and all).
[steps]2[/steps]
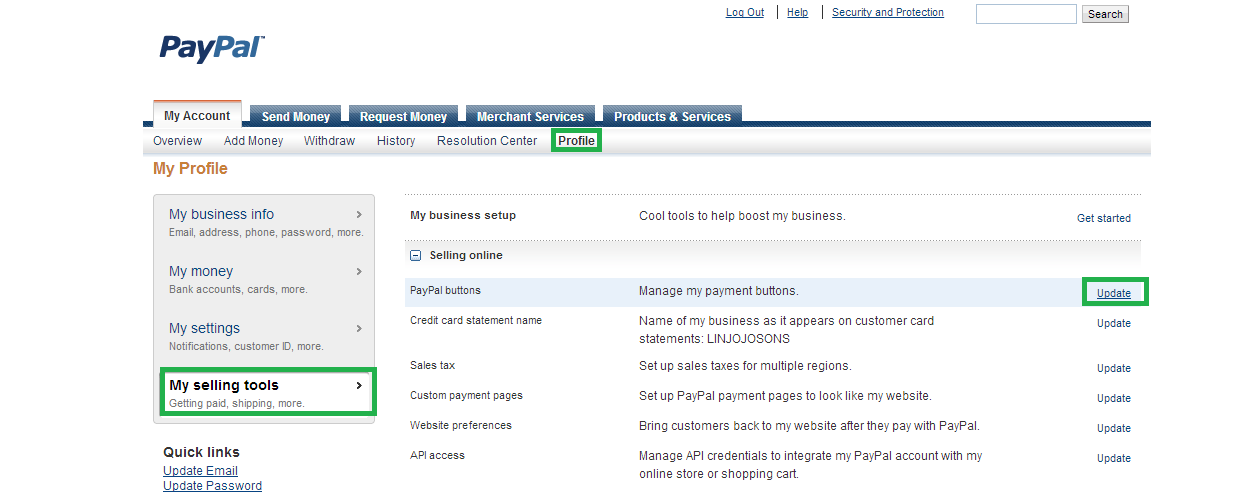
Create paypal buttons from the paypal business account profile
You can either create button from paypal(which makes you descent buttons) or you can create one by yourself. Basically a button is a simple html form posting some data (amount, currency etc) into the paypal and initiating the transaction.
You need to get into your Profile>My Selling Tools>Paypal Buttons>update.
There are three steps in creating a paypal button
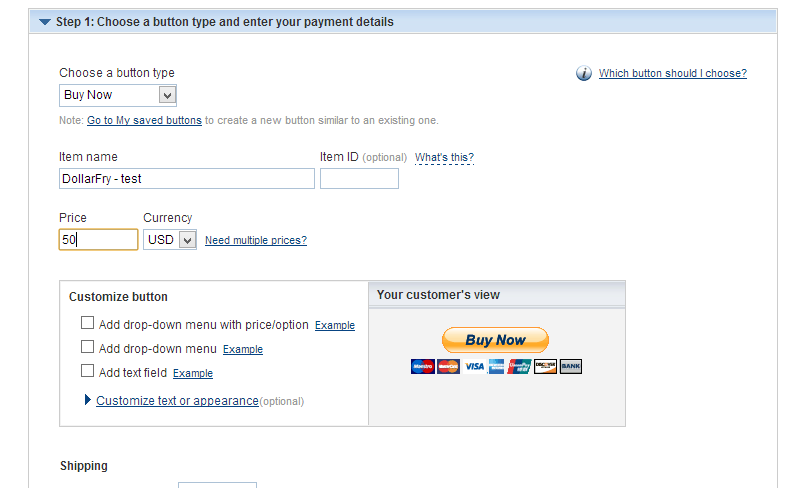
1 : Choose a button type and enter your payment details
Here as shown in the screenshot below, you can fix the amount for the button. Also in the button type you do have multiple options like shopping cart(through which you can create a shopping cart with paypal! ), buy now etc. Here we are using the buy now option . A price is set for the button (say 50 $) and once the button is clicked, the user will be taken to paypal to pay 50 dollars.
2 :Track inventory, profit & loss (optional) – Here you can track the inventory ,profit and all
3: Here we can set the return url and cancel url for the buyer.
Whats the purpose of Return url and Cancel Url?
At this stage you might have an idea of what happening or whats going to happen. You can integrate this button to your website , the user clicks the buy now button from your website and when the user makes a payment , the business account holder gets money credited into his account. After that the user must be returned back to your website so that only you can verify which user has paid the money and his transaction details. Once the payment is successfully completed, paypal posts back the transaction details (with the unique transaction id and all as $_GET parameters) to the return url where you can retrieve these parameters and store in database . You also need to verify the transaction id whether its a genuine transaction id or not.
The cancel url is nothing but at some point the user changes his mind and cancel the payment. After that the user will be returned to your website where you can show the notification that “Your transaction has been Cancelled!”.
And once you generate the button with paypal, you can save it and alter it later as you wish. Just paste the code into your website and the button will appear inside your website.
Alternatively, you can skip the above step(creating a button in paypals admin ) by pasting a self made form inside your website(which would be easy for you to customize , you can create an admin side in your website and easily configure the amount to paid by the user) .
This form will generate the paypal button.Here you can see that I am passing some hidden fields to paypal sandbox,
represents the sandbox business account which we created before, you can replace it with your business account details.
Represents the amount to be paid.
This is a custom field, which is the most useful part. This helps your to identify which user is making the payment. We can pass the user id along with this form and it will be returned to the return url along with the $_GET parameters so that we can easily save it into the database. This custom field can be used to connect with any attribute, like product id, product name or whatever.
These are the return url and cancel urls to your website.
Have a look at the complete list of Paypal variables which you can pass through.
[steps]3[/steps]
Verifying the paypal transaction in the Return Url
I’ve already mentioned about the return url and its use. You can see what all parameters are passed back to your websites return url(which the paypal have made after successful transaction). This do have a transaction id (txnid) .
You can get it through $_GET[‘txnid’] in your return url page. You need to verify this transaction id by sending it back to paypal and getting the response . What if a bogus user is accessing your return page url with a fake transaction id? So this stage is very important. We need to post a curl to paypal with the transaction id so that paypal will fetch back all the details of the transactions (like, amount, currency, country,address,email ) etc and you can save it in the database as a transaction record.
The paypal response string fetched through curl should look like this
SUCCESS mc_gross=50.00 protection_eligibility=Eligible address_status=confirmed payer_id=ZEDQ57L32HS3Y tax=0.00 address_street=1+Main+St payment_date=22%3A31%3A56+Aug+19%2C+2013+PDT payment_status=Pending charset=windows-1252 address_zip=95131 first_name=Sam address_country_code=US address_name=Sam+Alex custom=752/ payer_status=verified business=businesstest%40dollarfry.com address_country=United+States address_city=San+Jose quantity=1 payer_email=personaltest%40dollarfry.com txn_id=7B1573210T2407153 payment_type=instant last_name=Alex address_state=CA receiver_email=businesstest%40dollarfry.com receiver_id=NRWL58NJZA7TA pending_reason=multi_currency txn_type=web_accept item_name=normal mc_currency=AUD item_number= residence_country=US handling_amount=0.00 transaction_subject=752/ payment_gross= shipping=0.00
How can you verify your paypal transaction ID in your return page using curl?
Have a look at this verification of transaction id in paypal php.
 'https://www.sandbox.paypal.com/cgi-bin/webscr',
  CURLOPT_POST => TRUE,
  CURLOPT_POSTFIELDS => http_build_query(array
    (
      'cmd' => '_notify-synch',
      'tx' => $tx,
      'at' => $identity,
    )),
  CURLOPT_RETURNTRANSFER => TRUE,
  CURLOPT_HEADER => FALSE,
  // CURLOPT_SSL_VERIFYPEER => TRUE,
  // CURLOPT_CAINFO => 'cacert.pem',
));
// Execute request and get response and status code
$response = curl_exec($ch);
$status   = curl_getinfo($ch, CURLINFO_HTTP_CODE);
// Close connection
curl_close($ch);
if($status == 200 AND strpos($response, 'SUCCESS') === 0)
{
    // Save the Record into the database
}
Everything is pretty straight forward. You are sending a curl request to paypal sandbox with the transaction id ($tx) and getting the response in the $response variable. If the status is success , the transaction id is verified and we can save it into the database.
You might have seen the identity section,
$identity = 'Your Identity';
How can you get your Paypal Identity Token and set Auto Return?
You will be having a unique identity token for your paypal business account and that what we have given above as identity. You need to enable PDT(Payment data transfer) and Auto Return in order to get the identity token. By setting Auto Return, your user will be returned back to your return url(which is really an essential feature). You need to get into
Profile>My Selling Tools > Website Preferences (In the Selling Online section)
In that section you can set the return url, pdt and auto return. Check the screenshot below

Once you save the details, you can see the Identity Token along with the success notification. Just get into the website preferences again to get the identity token (in case you miss the notification).
You may need to use php Preg_match kind of function to retrieve particular details alone(say payer email).
[steps]4[/steps]
Usage of Paypal Instant Payment Notifications (IPN)
We can say that the paypal integration is complete with the above step (step 3). So whats the use of Paypal IPN?
Assume a situation that the user clicks the buttons from your site , makes the payment (in paypal) and his pc bursts out at that point(that is, before the user is forwarded to the return url). How will you know that this particular user have made the payment(well you got the money, but how can you identify the user and his trasaction id? ) Remember that you are getting all the details of the payment in the return url page.
Here is were paypal IPN comes to save you. IPN or Instant Payment Notification, as the name indicates, it sends an immediate request to your IPN your (some page in your website) right after the payment. And the user doesnt know or have to do anything about this request(nothing matters if his pc bursts off or loses his internet connection). The details of the transaction will be posted to the IPN url(which you’ve set) as a $_POST instance. You can retrieve it there, verify it as said above (with curl) and save it into the database.
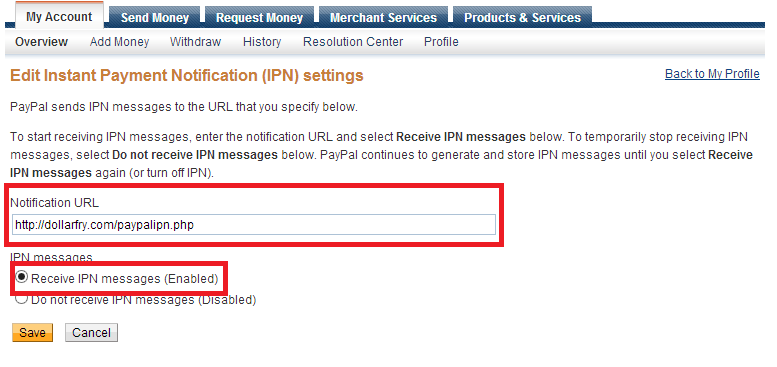
To use IPN, you need to enable it inside paypal.
Go to, Profile >My Selling Tools > Instant Payment Notifications(under Getting paid and managing my risk)
Under that you need Choose IPN Settings, and you need to provide an IPN Notification url and enable the Receive IPN Messages option.
 &$value) {
   $value = mb_convert_encoding($value, 'utf-8', $charSet);
 }
 $ipn_data['charset'] = 'utf-8';
 $ipn_data['charset_original'] = $charSet;
}
// Looping through the IPN Post Data and creating a final array of transaction details
foreach ($ipn_data as $key => $value) {
  $finalIPN[$key] = $value;
}
// Saving the encode transaction details  to the table
$dataJson = json_encode($finalIPN);
Advantage of using IPN
IPN is useful to handle safe returns. For instance, from your site, the user goes to paypal and the payment will be made. After that the user will be returned to your website, and the transaction data will be posted and you can verify the payment.
WHAT IF ???
- The power of the pc goes off
- The internet fails
- User closes the paypal window accidently
The user will pay the money to you, but you wont be able to track it right? This is where IPN is useful. Instant Notification(Posed data) will be made to the url you specify(you can store the data in your database or whatever) right after the payment is done(With as status of success,failure or whatever). You can verify and track this payement even if the any of the above scenarios happen.
Here in the $dataJson variable, you will be getting the entire transaction details encoded in json format.
So thats all about paypal php integration. Hope you enjoyed this tutorial. Shoot in comments and we are here to help you!
Your explanation after this point
“Here you can see that I am passing some hidden …”
becomes ambiguous. Mind contacting me on the email I have given to discuss further? Greatly appreciated 🙂
Hi Mike,
The html form was rendered as the button. I’ve now fixed it that the code for the form does shows now. Hope this helps 🙂
Hey TJ,
Thanks for the first clarification. Thing is I got another question to ask:
For this 2 codes (an extract only) as a whole
1)
…
// The custom hidden field (user id) sent along with the button is retrieved here.
if($_GET[‘cm’]) $user=$_GET[‘cm’];
// The unique transaction id.
if($_GET[‘tx’]) $tx= $_GET[‘tx’];
$identity = ‘Your Identity’
…
2)
…
$value = mb_convert_encoding($value, ‘utf-8’, $charSet);
}
$ipn_data[‘charset’] = ‘utf-8’;
$ipn_data[‘charset_original’] = $charSet;
}
// Looping through the IPN
…
Do I put this 2 whole set of codes on the same page with the paypal button? Or on separate pages? Or this 2 whole set of codes into 1 page and the paypal button being on another? Pardon my ignorance as I am doing a Paypal integration API for the 1st time.
Hi again, I cant seem to find the paypal response string.. where can I find it??
Hi i used your tutorial and it’s working very good according to my requirement but it will be very helpful if you post tutorial for negative testing of paypal as reference with above tutorial. Is it possible?
Hi Sagar,
I had a plan to write a tutorial based on negative testing. Was little busy with my clients these days, anyway I’ll come with one soon 🙂
thanx for replying linjojoson, actually i have used your tutorial code in one of my project. I will going to launch this in next month. If possible then please write negative testing tutorial within a month, if not possible then not a problem you can atleast tell some procedure of testing paypal data. This much of help also enough for me thank you very much for helping. Have a nice day..!!! Waiting for your reply..!!
Sagar, I’m very much glad that you liked it. I cannot guarantee whether I can complete about the negative testing tutorial this month as this month is also going to be busy for me. Anyhow I’ll come up with it as early as possible 🙂
Thank you very much i mean you have covered all aspects. Great job
Its all perfect, My Question is: I have my Website where 2 different Category of users includes: Customers and Performers signed up. Now through my Website customers wants to pay via PayPal to Performers, Is there a way in PayPal to achieve this. I saw your PayPal code, just curious to ask that is it possible to change (input type hidden values to whatever i will have in my Database also same case with input type hidden value money). Your reply to me can really save my Life. As I am only stucked in this Payment System Implementation in PHP my Site is all done.
Hi Anas,
You can use the pass through variables in paypal like custom, invoice,item_numberx,item_namex etc .You can pass these as hidden fields so that you can retrieve them back in response. You can pass the Performer ID and Customer ID as these variables and can get back them in the response to save it in the database. Will this help?
Can you please make some clarifications on Profile>My Selling Tools>Paypal Buttons>update since I am not getting the “My Selling Tools” option in my test site.
Hi Anuraj,
Check this image given below. You need, to login to your developer account(developer.paypal.com) and then to your sandbox accout(sandbox.paypal.com) (sandbox business test account). Then you need to navigate to the paypal buttons as shown in the image below
https://gomakebig.com/wp-content/uploads/2013/08/paypal-create-a-button-1024×407.png
Excellent post, thank you.
i cant get return transaction id to my return page in my website, all tries are done but i cant get id . plz help me.
Have you done anything to solve it?
i’ve done this. thanks for replying, next time if i’ll in trouble about paypal integration in codeigniter then definately i’ll contact you. Thanks again
Good commentary , I loved the points . Does anyone know where my assistant might be able to access a template MO DWC WC-G-11 example to fill out ?
I can’t get any response on my verify php file, response returns FAIL
Hello, I am using laravel framework in php, and I found that , I am able to get transaction id only when I put rm value 2 in input hidden field, means for post request, My problem is When I am using the returned transaction id with pdt token and requesting through curl then I am getting the following result : In status, i am getting 200 , but in response, i am getting 4020failed. Please help me at this point. Thanks.