
DEMO DOWNLOAD SOURCE
Facebook, being the most popular social network in this era, its applications also got high relevance. Facebook database contains the largest personal data all over the world. So how can you make a facebook application to access a third party data? Follow these steps.
Difference between Graph API and FQL
Graph API is the latest one , but still we may need to depend on FQL to get some complex results which graph API cannot fetch. FQL is facebook query language very much similar to SQL (structured Query Language). We can use either of them to fetch results from facebook, use the one which seems comfortable for you.
# Step 1 : Create a Facebook developers account and create an application.
- You need a facebook developers account in order to create a facebook application. Get in to the Facebook Developers Zone and sign up for a developer account and give a small description about the application you are going to make.
- After that you need to go to your home and take the manage apps from the settings menu .

- Take the Create New App option from the menu , and fill in the application name, app namespace (this will be your application url, dollarfry is the namespace for this app and application url becomes apps.facebook.com/dollarfy) and other required basic info.
- Facebook Integration – In this section we integrates our server with the app. We need to enter the site url where your application is being hosted, the canvas url and the secured canvas url . siteurl – canvas url – This point to the directory of the index file, for secured canvas url add https://
- SandBox mode – Enabling sandbox mode makes your application in testing environment. Disabling it makes your application live
# Step 2 : Download the php sdk Library for facebook ,include it in your index file and connecting with the application.
require 'src/facebook.php';
// Create our Application instance (replace this with your appId and secret).
$facebook = new Facebook(array(
'appId' => 'XXXXXX',
'secret' => 'XXXXXX',
));
Download the latest facebook sdk for php and upload it into your server. After all we are going on with the index.php (the main file were in which we are going to write the code for the app). You need to connect your file with the application id and secret key, so that facebook can verify the identity of your app . You can get the app id and app secret key in the main home page of your app.
Get your app id and secret key and Put them in the index file.
# Step 3. Get the login and logout url.
// Get User ID
$user = $facebook->getUser();
// Login or logout url will be needed depending on current user state.
if ($user) {
$logoutUrl = $facebook->getLogoutUrl();
} else {
$loginUrl = $facebook->getLoginUrl(
array(
'scope' => 'user_likes,user_photo_video_tags',
'redirect_uri' => 'https://gomakebig.com/facebook/'
)
);
}
First of all we get the user details, getUser function gets called from the sdk and it gets the user details (id and all of the currently logged in user). And if the user is logged in (or if a user session exists) it will get the logout url via getLogoutUrl(), so that the user can log out. ‘scope’ in the login url determines the permissions which we request facebook. Scopes varies depending on your app. Here, using this application we are fetching user likes and photos so that we are using the scopes user_likes,user_photo_video_tags , these are the access tokens for your application. The redirect_uri is the url which we want to redirect the user after logging in. I will be explaining the scopes more detailed in next step (step 4) using the graph api explorer.
[df_hireme2 text=”to develop a facebook application(or consultation)” extratext=”I have more than 5 years of experience in WordPress and PHP and have developed many facebook application for various clients”]# Step 4 : Getting results using graph api
// Getting Results using Graph Api.
try {
// Proceed knowing you have a logged in user who's authenticated.
$userProfile = $facebook->api('/me');
// Getting the User Likes
$userLikes = $facebook->api('/me/likes');
// Applying the field and connections, (Getting bio and photos limited to 2)
$fieldConnections=$facebook->api('me/?fields=bio,photos.limit(2)');
// Processing the Likes array to the like name only
foreach ($userLikes['data'] as $key => $value) {
$likedNames[]=$value['name'];
}
// Processing the fieldConnections to get the photo url only
$processedFields=array();
$processedFields['bio']=$fieldConnections['bio'];
foreach ($fieldConnections['photos']['data'] as $key => $value) {
$processedFields['photos'][]= $value['source'];
}
} catch (FacebookApiException $e) {
error_log($e);
$user = null;
}
If the user is logged in and the session exists, we can fetch the results via the api.
$userProfile = $facebook->api(‘/me’) – This fetches the user details, with all the public profile info. This means we can fetch users name, id, first name, last name and all the other public profile information. If you check the first table column of the demo application, you can see the results fetched.
4.1 How to use the Graph API explorer?
Graph Api Explorer
Graph API is one of the powerful tools provided for the users by facebook. This helps you to see all the results fetched using your graph API. This also makes the implementation of fields, connections and other permissions easy . Using the graph api explorer makes your development a way more easy than you expect , so its really recommended to use rather than sending requests to facebook from your application(in the testing phase).
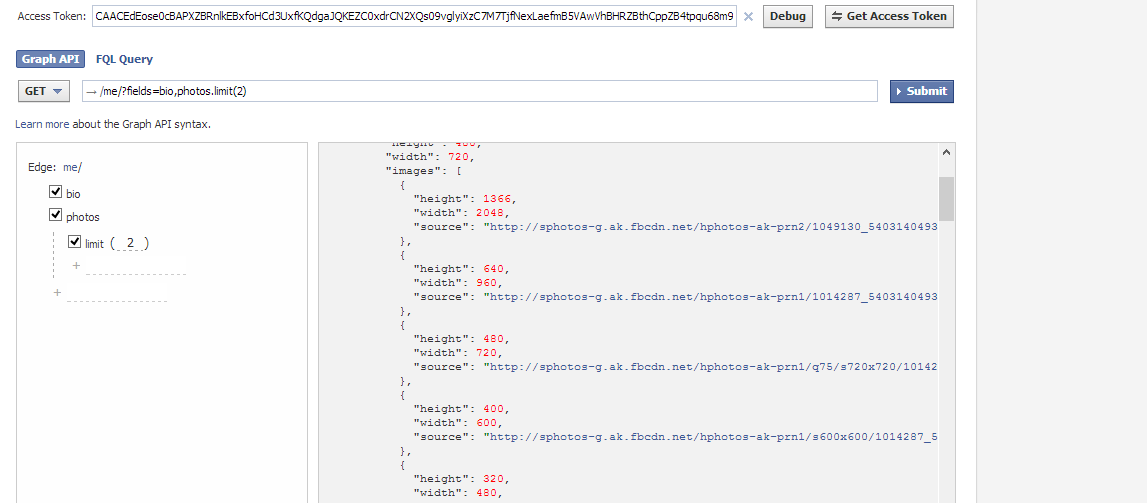
In this screenshot, I’ve fetched the user bio and photos(limited to 2), via graph api. I just added the field and connection(or in short what ever data I need ) and it generated the graph api for me. You can have a look at the complete reference to graph api and the permissions needed for accessing it. Of which the User graph api is the most important one. The graph api explorer generates access tokens for the permissions provided. You can check the permissions for the access tokens generated by selecting Get Access Token button .
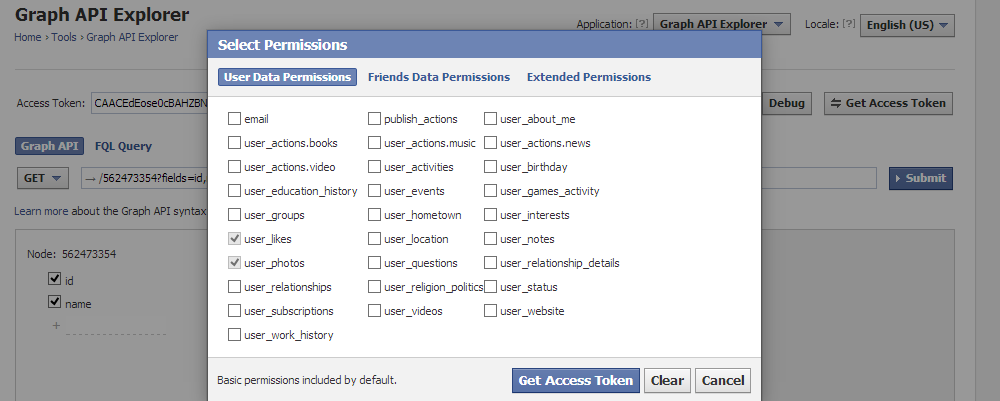
In the above screenshot you can select the permission which you need so that it will generate the access token corresponding to the token and you can fetch the required results.
Before getting into field and connections, its better you read the Getting Started with Graph API page in facebook, this explains detailed about field and connections. But if you got the concept already you may skip they.
4.2 Explaining The Results Obtained
Result 1 : User Profile using Graph api
$userProfile = $facebook->api('/me');
The first widget deals with displaying the user profile details, this is fetched through /me . Which displays all the user details.
Result 2 : User Likes using Graph api
$userLikes = $facebook->api('/me/likes');
/me/likes will fetch all the likes of the user, the permission required is user_likes . Here like is a connection. We do a foreach loop in the obtained result and process the likes to a different variable and prints it.
Result 3 : Fields and connections using graph api.
$fieldConnections=$facebook->api('me/?fields=bio,photos.limit(2)');
Fields and connections explains how we can fetch data in different cases . In User Graph API,
you can have a look at the different fields and connections and their permissions needed for user api. Here we are using field and connections simultaneously. We have used the field bio of the user api and the connection photos , which brings out the bio of the user and the photos in which user has been tagged. This require permission user_photo_video_tags.
You might have seen the limit in the end of the graph api, this limits the photos fetched to 2( The most recent two photos). Here I’ve displayed the bio and two photos seprately and the whole results array are printed below .
# Step 5: Getting results using FQL
try{
// Fql query to get the user details
$fql1 = "select name, about_me, age_range, sex,pic_square from user where uid=" . $user;
$param = array(
'method' => 'fql.query',
'query' => $fql1,
'callback' => ''
);
$fqlOutput = $facebook->api($param);
// Fql Query to get the user movies and music.
$fql2 = "select movies, music from user where uid=" . $user;
$param = array(
'method' => 'fql.query',
'query' => $fql2,
'callback' => ''
);
$fqlMovies = $facebook->api($param);
}
catch(Exception $output){
print_r($output);
}
FQL query is a little bit different from graph api and very much similar to SQL . FQL helps you to obtain very complex results from facebook which the graph api cannot. Here $fql1 and $fql2 holds the fql query which we are sending to facebook. and $user is the user instance which we have mentioned above. $param holds the general keys .
The only javascript we’ve used in the whole code is for redirecting the the user to the application page.
top.location.href = '$loginUrl';
NB: Regarding the new facebook terms, an ssl (https) is required for authentication. You need to login into facebook first or what you see would be an SSL error.
It took me heaps of time to write this whole tutorial in detailed . We will be always here to help you, do post your suggestions, queries or whatever as comments .
Thanks . Good article
Impressive article on creating FB app. Bookmarked it…
Naim Shaikh
Very Interesting Article , thank you very very much